This article serves as a reference document for the user to configure and run test sequences for the UUT (Unit Under Test) using the GRL Power Suite Pro (GRL-PSP) software and the GRL-USB-PD-C2 USB Type-C Test Controller Hardware / GRL-USB-PD-F1 USB Power Performance Tester.
Note: For details on using the GRL-PSP software or the GRL-USB-PD-C2 / F1 Controller, please refer to their respective user documentation on GRL's website.
Run Test Sequences
The Sequencer function of the GRL-PSP is used to simulate several test cases in custom sequence for the UUT that is connected to USB Test Port 1 or Port 2 of the GRL-USB-PD-C2 / F1 Controller.
Here are the steps to configure and run test sequences:
- On the Sequencer screen, select the Port of the GRL-USB-PD-C2 / F1 Controller (that is connected with the UUT) and then select which Test to be performed. Click on the Add Test button to configure and add the test to the list on the left panel. Repeat this process if there are multiple tests to be added and run. The left panel should display a list of all selected tests for the respective Test Port of the GRL-USB-PD-C2 / F1 Controller
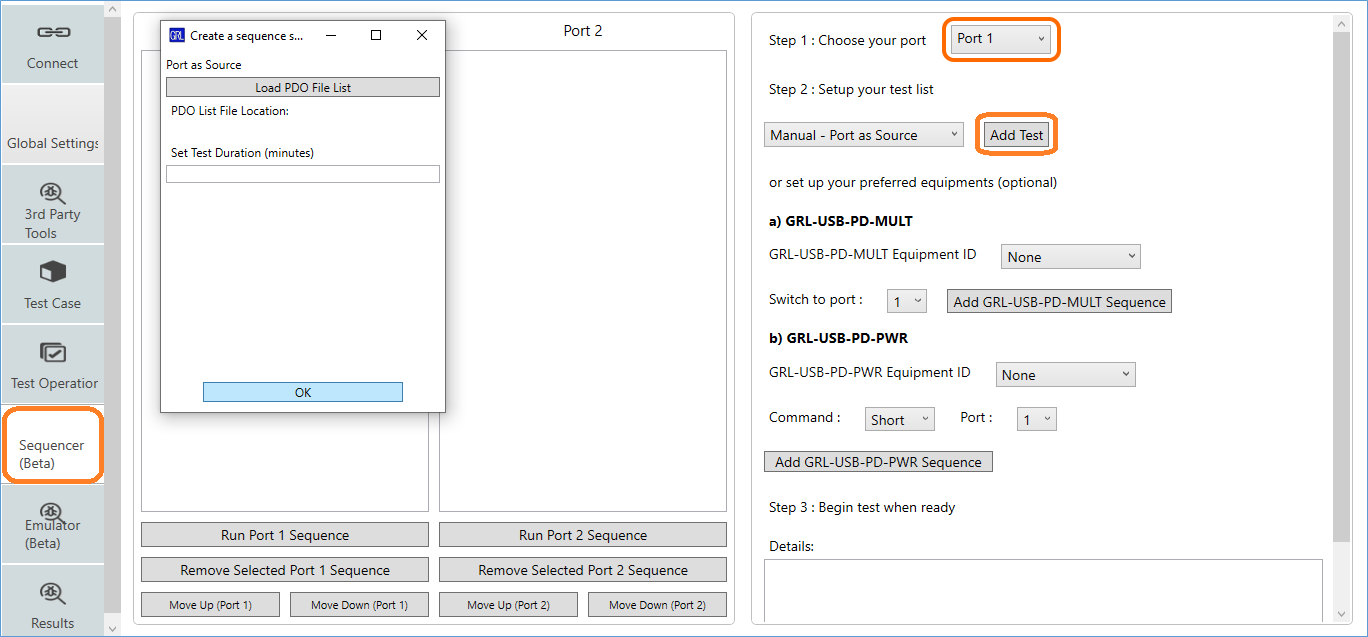
Figure 1: Sequencer – Set Up Test List - The user can select the following buttons below the test list panels to delete selected tests or rearrange the test sequence for the respective Test Port.

Figure 2: Sequencer – Remove or Move Selected Tests in List - If an external fixture is used to control the UUT, select the Equipment ID of the fixture and set up the port connected with the UUT. Then click on the Add <fixture> Sequence button to create a test sequence for the particular fixture.
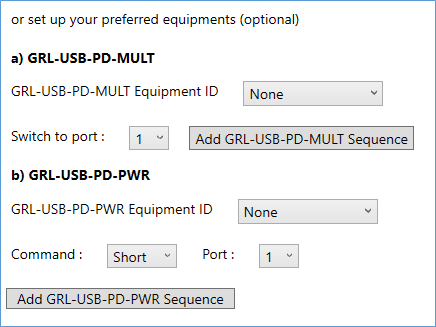
Figure 3: Sequencer – Add Fixture Test Sequence - When done, click on the following Run Port 1 / 2 Sequence button below the test list panels to start running the test sequence for the respective Test Port.

Figure 4: Sequencer – Start Test Sequence Run - The user can also view details of each test in the sequence by double-clicking on the desired test. The information should be displayed in the Details field.
- The test run can be stopped at any time by clicking on the Stop Port 1 Sequence button.