This Article serves as a reference document for the user to determine the best coupling position/proper alignment of the TPR coil with the BSUT (DUT) in where the Signal Strength Value is highest before running tests on the GRL-WP-TPR-C3 (aka GRL-C3) WPC Qi Wireless Charging Base Station Tester Hardware via the GRL-C3 Automation Test Browser Application.
Test Configuration with GRL-C3
The GRL-C3 Browser App Test Configuration screen allows the user to select which set of tests is run on the DUT, set up test parameters, run selected tests and generate test reports.
- Open the GRL-C3 Browser App and connect to the GRL-C3 tester hardware. For details on using the Browser App and initial hardware setup, refer to the GRL-C3 Browser App user documentation in http://graniteriverlabs.com/download-center/.
- Go to the “Test Configuration” screen as shown in Figure 1 below.
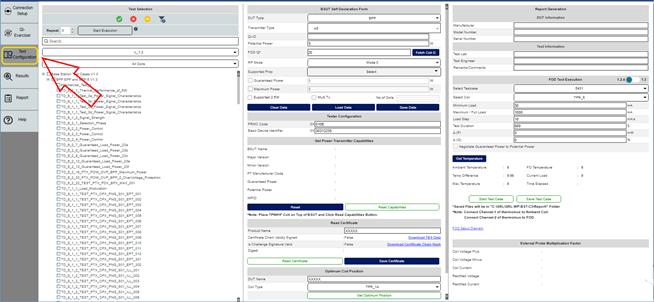
Figure 1: Test Configuration Screen
Before running any tests, make sure to configure the Optimum Coil Position pane as described below.
Optimum Coil Position
The user can determine the best coupling position/proper alignment of the TPR coil with the BSUT (DUT) in where the Signal Strength Value is highest prior to testing as follows:
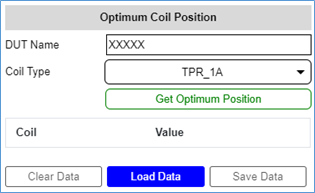
Figure 2: Configuration for Optimum Coil Position
- DUT Name: Enter the name of the DUT for the coil positioning test in the DUT Name field.
- Coil Type: Use the Coil Type drop down to select the type of TPR coil to be positioned on the Interface Surface of the DUT such that the DUT can achieve the maximum signal strength value.
- Get Optimum Position: Click on the Get Optimum Position button to start the coil positioning test once the TPR coil is placed on the Interface Surface of the DUT. During this process, adjust the coil in various positions on the DUT surface to obtain the maximum signal strength value. When the test has completed, the results will be displayed below this button. The Results screen will also display the results/details of the test case that is running in real-time as shown in the example below:

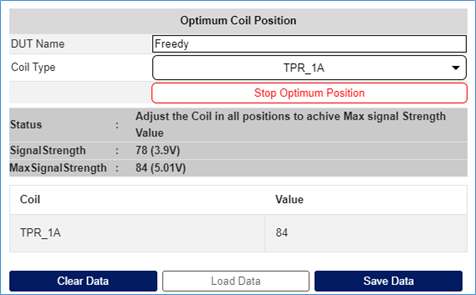
Figure 3: Example of Optimum Coil Position Test Execution
- Clear Data: Click on the Clear Data button to clear existing test results or details after completing the coil positioning test.
- Load Data: Click on the Load Data button to load and use data from a saved configuration file.
- Save Data: Click on the Save Data button to save the current configuration to a file after completing the coil positioning test.