This Article serves as a reference document for the user to configure and set up the GRL-WP-TPR-C3 (aka GRL-C3) WPC Qi Wireless Charging Base Station Tester Hardware before running tests via the GRL-C3 Automation Test Browser Application.
Test Configuration with GRL-C3
The GRL-C3 Browser App Test Configuration screen allows the user to select which set of tests is run on the DUT, set up test parameters, run selected tests and generate test reports.
- Open the GRL-C3 Browser App and connect to the GRL-C3 tester hardware. For details on using the Browser App and initial hardware setup, refer to the GRL-C3 Browser App user documentation in http://graniteriverlabs.com/download-center/.
- Go to the “Test Configuration” screen as shown in Figure 1 below.
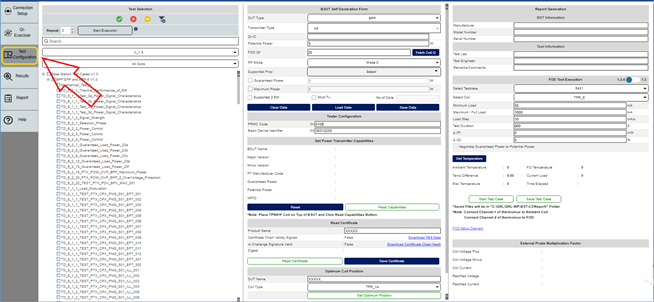
Figure 1: Test Configuration Screen
Before running any tests, make sure to configure the Tester Configuration pane as described below.
Tester Configuration
Set up the GRL-C3 tester hardware identification as follows:
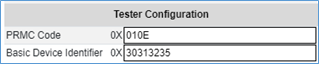
Figure 2: Configure Tester
- PRMC Code: Enter the Power Receiver Manufacturer Code (PRMC) ID of the TPR in the PRMC Code field.
- Basic Device Identifier: Enter the Basic Device Identifier ID of the TPR in the Basic Device Identifier field.