This article serves as a reference document for the user to set up the DUT (Device Under Test) and configure the test setup before running tests on the GRL-WP-TPR-C3 (aka GRL-C3) WPC Qi Wireless Charging Base Station Tester Hardware via the GRL-C3 Automation Test Browser Application.
Test Configuration with GRL-C3
The GRL-C3 Browser App Test Configuration screen allows the user to select which set of tests is run on the DUT, set up test parameters, run selected tests and generate test reports.
- Open the GRL-C3 Browser App and connect to the GRL-C3 tester hardware. For details on using the Browser App and initial hardware setup, refer to the GRL-C3 Browser App user documentation in http://graniteriverlabs.com/download-center/.
- Go to the “Test Configuration” screen as shown in Figure 1 below.
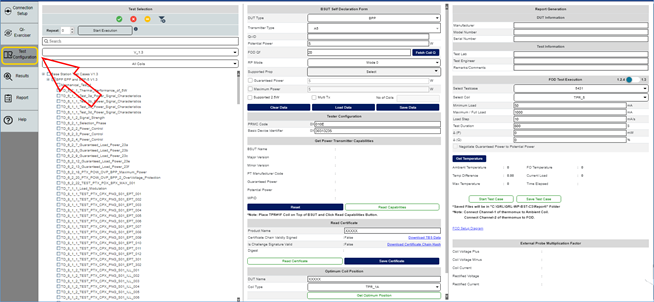
Figure 1: Test Configuration Screen
Before running any tests, make sure to configure the BSUT Self Declaration Form as described below.
BSUT Self Declaration Form
Before running tests, the user will need to provide information on the DUT using the BSUT Self Declaration Form as follows:
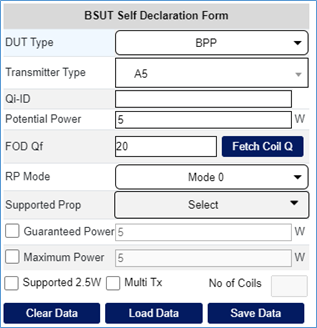
Figure 2 Configure BSUT (DUT)
- DUT Type: Use the DUT Type drop-down to select either “BPP” (Baseline Power Profile), “EPP” (Extended Power Profile), or “EPP5” (Extended Power Profile 5) as supported by the DUT.
- Transmitter Type: Use the Transmitter Type drop-down to select the coil type of the DUT.
- Qi-ID: Enter the device identifier of the DUT in the Qi-ID field.
- Potential Power: Enter the maximum power supported by the DUT in the Potential Power field.
- FOD Qf: Set the Reference Quality Factor value in a FOD Status Packet in the FOD Qf field.
- Fetch Coil Q: Click on the Fetch Coil Q button to calculate and display the Reference Quality Factor value of the reference TPR coil which is selected from the FOD Test Execution pane. The Reference Quality Factor value will be applied in the Extended Power Profile tests.
- RP Mode: Use the RP Mode drop-down to select the Mode for the Received Power Packets to be sent by the TPR.
- Supported Prop: Use the Supported Prop drop down to select the supported Proprietary Packet to be sent by the TPR.
- Guaranteed Power: Select the Guaranteed Power checkbox to enable the Guaranteed Power Value to be entered for negotiation.
- Maximum Power: Select the Maximum Power checkbox to enable the Maximum Power Value to be entered for negotiation.
- Supported 2.5W: Select the Supported 2.5W checkbox if the DUT supports a 2.5 W USB power supply.
- Multi Tx: Select the Multi Tx checkbox if the DUT supports multiple coils.
- No of Coils: If the Multi Tx checkbox is selected, specify the number of coils supported by the DUT in the No of Coils field.
- Clear Data: Click on the Clear Data button to reset to the default configuration.
- Load Data: Click on the Load Data button to load and use data from a saved configuration file.
-
Save Data: Click on the Save Data button to save the current configuration to a file.
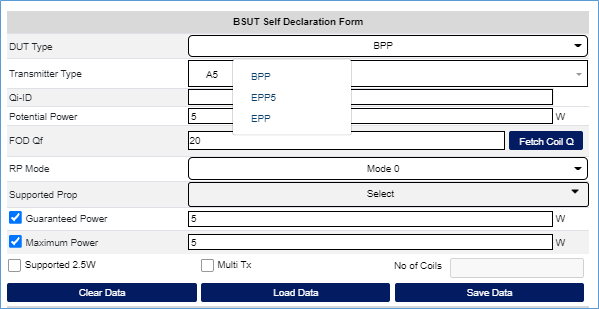
Figure 3: Example of BSUT (DUT) Configuration